Setup
Adyen
Create transaction user
- Go to “settings”, “users” and choose “Add a new user”.
- Choose type “Webservice”
- For roles, use the following settings:
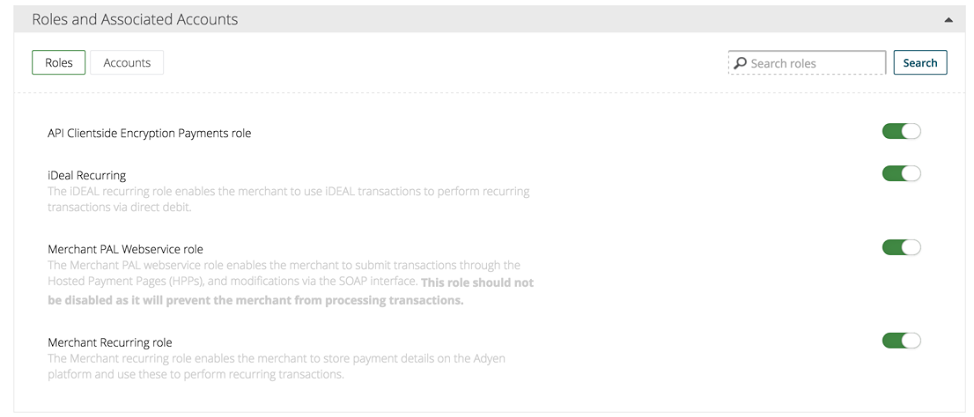
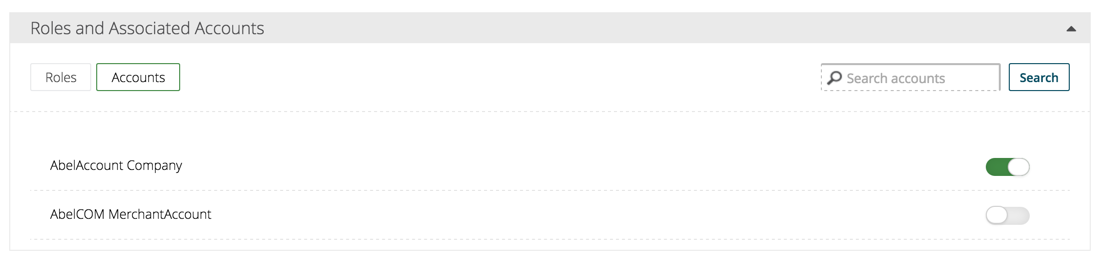
- For associated accounts, make sure that it only has access to the parent account, not the the underlying merchant account:
- Enter the username and password separated by a colon (“:”) in the Abel Admin panel under “Adyen transaction username and password” in Settings, Payments
Create reporting user
- Go to “settings”, “users” and choose “Add a new user”.
- Choose type “Report user”
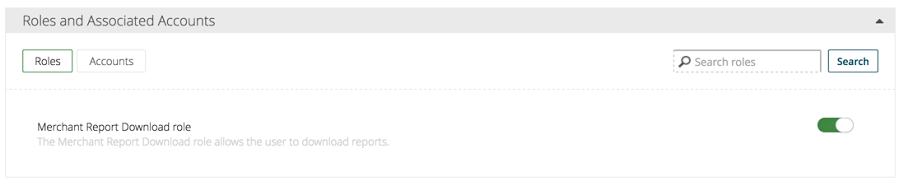
- For roles, use the following settings:
- For associated accounts, make sure that it only has access to the parent account, not the the underlying merchant account:
- Enter the username and password separated by a colon (“:”) in the Abel Admin panel under “Adyen reporting username and password” in Settings, Payments
Set webhooks
- Select the company (ie. the child account of the merchant account):

- Go to “settings”, “server communication”
- Set the following notifications (for accept, replace
api.abel.taxiwithapi.accept.abel.taxi):- Ideal Details Notification:
https://api.abel.taxi/AbelService/AdyenIdealNotification?contractId=[contractid] - Standard Notification:
https://api.abel.taxi/AbelService/AdyenRecurringContractNotification?contractId=[contractid] - Standard Notification:
https://api.abel.taxi/EventService/AddAdyenEvent?token=oEOijSQXdHCmzkTc8qK3&contractId=[contractid]
- Ideal Details Notification:
Subscribe to reports
- Select the company (ie. the child account of the merchant account)
- Go to “reports”, find “Payment accounting” and choose “subscribe”
- Choose CSV in the following dialog and press save
Set capture delay to manual
- Go to “settings”, “merchant settings”
- Change “capture delay” to “manual” (and submit)
Create a new skin
- Go to “Skins”
- Click create a new skin
- Click “Generate new HMAC Key” for both test and live.
- Save both keys somewhere, after saving you can’t view them anymore.
- Select Enable and visible for iDeal under ‘OneClick options’ and deselect the rest.
- Press ‘Save skin to test’ at the bottom of the page
To white-list a user that is on the global Adyen fraud list
These steps can whitelist a customer that cannot use our service because his payment method is on the global Adyen blocklist. Whitelisting them is on your own risk!
- Go to “settings”, “fraud control”
- Press the config icon to the right of “Card/Bank Account number referral”
- Press the config icon to the right of the payment method type
- Enter the details of the payment method, choose “trust” and press apply
Request Adyen support to:
- Turn on recurring contract notifications (on both test and live)
- Turn on auth Sepa Direct Debit after an iDEAL transaction (on both test and live)
- Enable, for an authorisation request with a hashed creditcard, where we store it as recurring payment method, in the response in the additionalData object the parameters expiryDate, paymentMethod, cardSummary, cardHolderName, alias
PayPal
- The Braintree connection doesn’t report chargebacks. You therefore need to set a webhook in Paypal Developer (in My Apps & Credentials):
- Events: “Customer dispute resolved” and “Payment capture reversed”
- Url: https://api.abel.taxi/EventService/AddPayPalEvent?contractId=[xx]
Setup email
- Ask Abel to add the domain you wish to use to the Amazon SES verified domains. Abel will send you back a list of DNS-settings
- Add these DNS settings to your domain and inform Abel that you have done so
- Abel will verify your domain and you are good to go
Mailchimp
In Mailchimp, go to “Accounts” (top right drop down menu), “Extras”, “API keys”. Create a key and copy it in the Abel Admin panel under “Settings”, “Mail”, “Mailchimp API key”.
Create a new list to which the Abel stack can add new customers with Newsletter=true. Go in Mailchimp to “Settings”, “List fields and |MERGE| tags” and make sure you have at least the following fields (next to email address):
- First name (with FNAME under “Put this tag in your content”)
- Last name (with LNAME under “Put this tag in your content”)
- Promocode (with PROMOCODE under “Put this tag in your content”) Go to “Settings”, “List name and defaults” and copy your “List ID” in the Abel Admin panel under “Settings”, “Mail”, “Mailchimp customer list ID”.
Create a new list to which the Abel stack can add all new drivers. Go in Mailchimp to “Settings”, “List fields and |MERGE| tags” and make sure you have at least the following fields(next to email address):
- First name (with FNAME under “Put this tag in your content”)
- Last name (with LNAME under “Put this tag in your content”) Go to “Settings”, “List name and defaults” and copy your “List ID” in the Abel Admin panel under “Settings”, “Mail”, “Mailchimp driver list ID”.